Sunday, June 24, 2012

moccasins, the final product

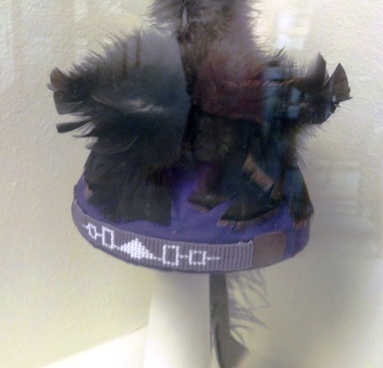
After spending the first two days of our week on the Longhouse project, the weather turned ridiculously hot and humid, so we hid out indoors in the air-conditioning and dedicated ourselves to finishing up the moccasins. We had already spent several work sessions making patterns, cutting out the leather, marking out where to punch holes for sewing, sewing the tongues to the rest of the shoes, and marking them for the heels. This week they sewed up the heels, then sewed on straight strips of leather to the top for flaps. And finally, they were done and ready to wear!


This was a MUCH more involved process then I had imagined, and wound up taking up the bulk of the craft time I'd planned on for this unit. We are still going to make a scaled-down version of Aionwahta's wampum belt (as soon as the rest of the wampum we ordered comes in), and this summer we will come up with some sort of finished product from the porcupine quills (which are turning out to be much more difficult to work with than we had anticipated as well), but have decided to push off the cornhusk dolls and turtle shell rattles for the fall, when we'll be needing a couple of Native tribe crafts anyway.


This coming week the boys have "Indian Woods Wisdom" camp at a wonderful nature center to sort of put a hands-on wrap to our unit. Hopefully we can squeeze in a work day or two on our Longhouse and get that finished up, too. And then -- summer break!

Longhouse, day 5


Up went the cover! With a lot of help and persistence (and fearless moms on ladders), we got the Longhouse covered with two large tarps. Real Longhouses were covered with large chunks of bark from large Elm trees, but not only don't we have large Elm trees in New England anymore, I wasn't going to kill any large trees just to harvest their bark even if there were. So we compromised.
We lashed down the tarp where we could, but it's really the outer framework (next step!) that will hold the covering in place.

Above, the inside of the Longhouse.


Below, Rosebud snoozed under a tree for part of the morning. J spent a lot of time sleeping under trees when he was a little dude, too.


Above, the kids work on lashing together the outer framework. In the name of efficiency, we decided to do this on the ground and then raise and anchor it in place rather than build it in place as we did with the inner frame, since they'd already had that experience. Below, next step was to lash the side panels the kids built to post and poles at either end of the house in order to get the whole thing to stand and be stable.


One more work session will finish the exterior, with roof arches and poles, and doors. And then there will be one more session to build sleeping benches, interior separations, and fire pits, and to create our clan logo to hang above the door. The kids are already pretty proud of the structure and are already having a lot of fun playing in and around it.


Tuesday, June 19, 2012

Longhouse, day 4

Yesterday we finished the interior framing of our Longhouse. Above, we started by lashing on top poles on each side. Then, below, we started lashing on other side poles.


Above, when the side poles were all done, we lashed on a sapling and bent it into place to create the roof arches. Then, below, we used long thin poles to add stability to the roof.


It sort of remains to be seen whether or not our framing holds up to our cover (which we'll be putting on tomorrow). Fingers crossed!


Monday, June 18, 2012

Longhouse, day 3

We began day 3 of our Longhouse construction by scorching the ends of the posts (to prevent them from rotting in the ground), above, while laying out our construction site and digging holes where the posts were going to go, below:


Then, working in teams of two, the kids grabbed a post from the fire and dragged it to their holes:


One of the partners held the post while the other back-filled the dirt around it:


Then they went back to the fire for another post and switch jobs to set it.


Below, our Longhouse at the end of the day:


We were all exhausted after a work-filled week, and were happy to have a couple of days off to relax. But it's back to work on it today!

Longhouse, day 2

This day we cut the branches and leaves off of the trees we cut (and fed them to the goats, who said YUM!). Armed with loppers, our crew of workers turned our saplings into poles and posts.


Then we cut the poles and posts to length (Zoo Boy, below, with loppers, but much of this was done with bow saws as well). The poles and roof arches were cut to 10 foot lengths, and the posts to 6 foot for the most part (although we needed eight 8 foot posts as well).


Then we spent some time stripping bark off our poles and posts (Zoo Boy below). The Haudenosaunee did that to prevent insect infestation of their homes, and also because the strips of bark were used as lashes during construction. They had an easier time than we did, because they used Elm saplings, and Elm bark strips off fairly easily and in long strips. We were using mostly Sugar Maple, which is no where near as easy to strip, and the strips in general are too short to be used for lashes. We discussed the difference, and talked a bit about why there aren't Elm trees to use (they were wiped out during a blight in the middle of the last century).


We let the kids do as much bark stripping as they wanted to, but the project will progress with bark still on most of the poles and posts. Our Longhouse only really needs to survive the summer, not a couple decades, so there's no point in putting days and days into a difficult, tedious task for no real gain.


Above, one of my bigger challenges, trying to keep fair little Rosebud enough in the shade not to burn her to a crisp! She's done pretty well between being carried in the sling and the Ergo, and being passed about by the other adults.

Longhouse, day 1

Last week we began our Longhouse construction project. (The weather finally cooperated!) We invited a few other families to join us, because Longhouse building is a community project, and because it's just more fun to do things with friends! So we headed into the woods to identify which trees to cut.


We used several methods for cutting. Above, J uses a hatchet, and below a bow saw, to take down young trees of the right size. (The Map Man took the day off from work to supervise the use of the hatchet, and to take down a few of the larger trees for us.)


Below, Zoo Boy uses a pair of loppers to take out a sapling that will make a good arch for the roof. All of the kids had a chance to use each type of tool for cutting, and we took out about 50 young trees in all to use for our project, in addition to another 50 or so seedlings and saplings that were too small for us, but needed to be cut (this improved the health of the stand of trees by leaving them with less competition for nutrients, so was good forestry in addition to providing us with our building materials).


Below, we all then dragged all of the trees to our working site.


It was a good start to the project!

Saturday, June 16, 2012

three sisters garden, week 3

Look, our corn is a finger's length high! Time to plant the other two sisters (the beans and the squash).

First, we planted the beans in the sides of the mounds our corn is growing in, one hole in each of the four directions, one bean per hole:


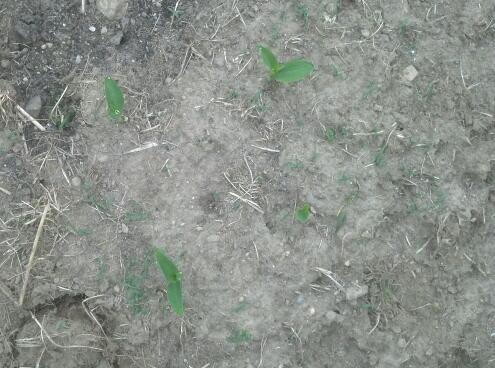
Then we raked up new mounds between the corn mounds, and planted our squash seeds in those, again, one seed for each of the four directions.


We got creative with our "squash", planting two varieties of summer squash, as well as cucumbers, watermelons, and pumpkins.


Above, our sunflowers are also coming up!

Below, what our garden looks like now.


By next week our corn will be a hand's length high, which means it will be time to weed our garden!

Howe Caverns

We were already out there for the Iroquois Museum, so since Howe Caverns was literally right above (see the last picture on this post) the museum, we spent our second day in the Cobleskill area there.


Don and the boys joined Laurel's family on a tour of the caverns (walking and boat ride). I've been in the caverns before, and I LOVE them, but I also know how inappropriate a place it is to take a baby, so Rosebud and I stayed up top and rocked on a porch in the lovely early summer breezes, overlooking an amazing view. The kids loved the caverns, Dakota (Laurel's oldest) says she's going back for spelunking for her 16th birthday (when she'll be old enough to do the more intensive cavern exploring tours), and J's all over that idea, too. I bought the kids a couple of books about caves while they were down there, which they enjoyed reading on the ride home.


(The above picture is J's "official" photo from the tour, Zoo Boy was too afraid to go stand next to him, and The Map Man's photos didn't come out great, something about all that darkness and a phone's camera....)


We also took full advantage of the fun amenities available to us at our hotel during our overnight stay. We swam...


...we hung out in the super-cute downtown area of Cobleskill after a yummy dinner at a local pizza joint...


...we bowled...


...and we hung out with each other in our hotel rooms. Hey, look, Laurel finished the baby sack and hat for Rosebud! Doesn't she look ridiculously cute in them?!


I snapped the above photo on the way home -- that's Howe Caverns at the top, with the Iroquois Museum beneath it.


GREAT field trip! Homeschooling is totally the best....

Friday, June 15, 2012

Iroquois Museum, part 3 (crafts and projects)

There were just so many tie-ins with what we've been working on at home for crafts and projects that I wanted to write a post just highlighting those. There were many images and representations of the Three Sisters Garden, like the one above, throughout the museum. Of course, we were still in the midst of planting our own garden (we've since finished, which I'll be blogging about as well).


Here's a 1/12 model of a Longhouse. We started work on our Longhouse (more of a 1/3 model) this week.


Moccasins, we are closing in on the completion of our own moccasins.


They called this the "dice game", but it's the Peach Pit game. All the kids groaned when they saw it (none of them are too fond of playing the Peach Pit game), but Laurel and I had a good laugh.


Earrings made with beads and porcupine quills. Ok, well, we're not making earrings with our quills, but this was the only example of quillwork we could find in the museum. We asked about it, and the older man told me that there really isn't anybody who works with the quills anymore. He said he has a big box of them at home, as do most folks he knows, but there's really nobody to teach the tradition of quillwork anymore. He was pretty interested in our intended craft project with them, and found us a book to look at that showed some examples (unfortunately in black and white). Amusingly, he told us our best bet for information would be an Internet search.


Turtle shell rattle. The ones we make are going to look a bit different from this one (first of all, this is a snapping turtle shell, ours will be red-eared slider shells), but it was cool to see a "real one" before starting work on ours.


These hats were cool, there was a display with one hat for each of the 6 tribes of the Iroquois Confederacy. Each had the replica of Aionwahta's wampum belt beaded on the front, about the size of the replica we're going to make this summer.


Braided corn, something we'll do when we harvest our Three Sisters Garden this fall, and certainly something we read about in our epic.


Cornhusk doll of a woman making a cornhusk doll (pretty clever!). I liked the traditional dress and beading on this one's costume. There were many examples of dolls -- we'll probably make some late in the summer/early in the fall when we start learning about our local tribes.


Ok, that's enough about the museum. I'm glad we went, it was a great experience for the kids. Next I'll post more about the rest of our trip, then we can get into some of the great stuff we've been working on this week -- it's been a busy, busy week!!